
In construction, a point cloud is the 3D digital copy of a building: millions of points measured with a laser scanner on walls, slabs, façades and services, each defined by its X, Y, Z coordinates. It has nothing to do with the statistical chart of the same name. It is produced by static or mobile laser scanning, assembled station by station, then used in Revit or ArchiCAD to produce drawings or a BIM model of the existing building. This guide covers the whole chain: how the cloud is produced, its real density and accuracy, the file formats (E57, RCP, LAS), how to bring it into your design software, and what to order, point cloud alone or BIM model, depending on your project.
Just need a price for your point cloud? The quote configurator prices your survey in 2 minutes.
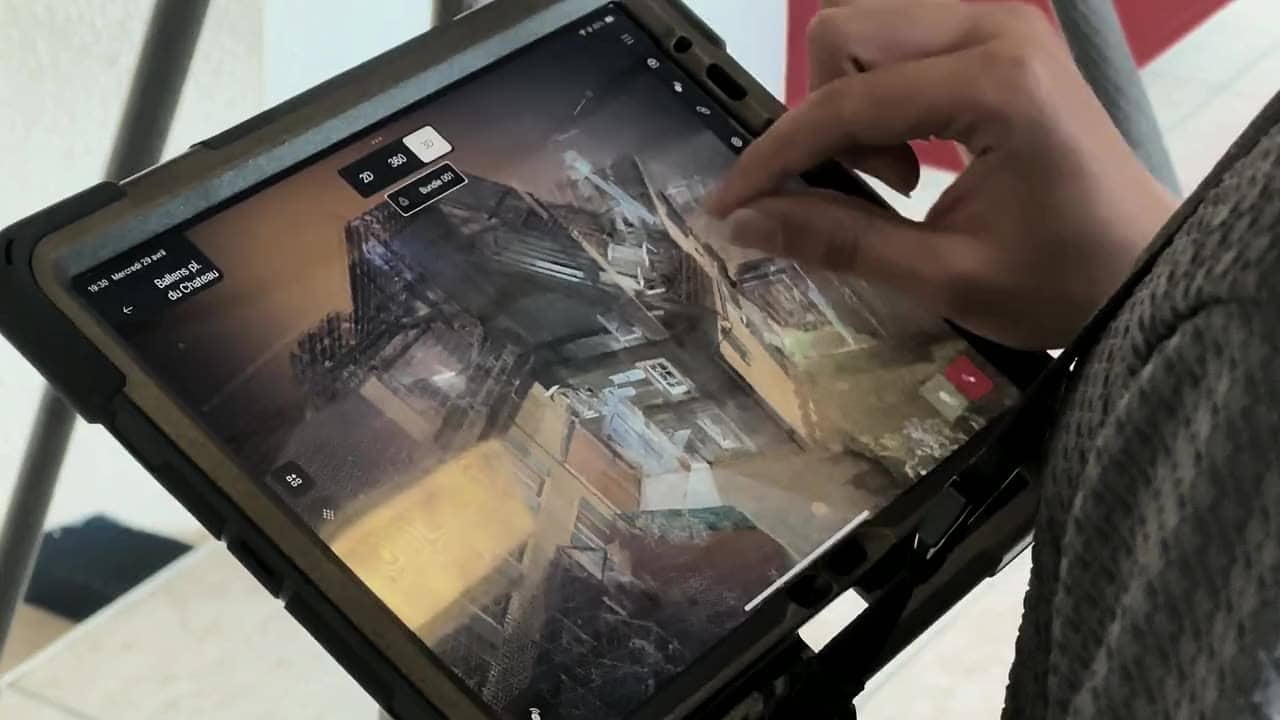
What is a 3D point cloud of a building?
In concrete terms, every point in the cloud is a measurement: the scanner emits a laser beam, the wall reflects it, the instrument derives a distance and records a point in space. Repeat that up to 2 million times per second (the rate of a scanner such as the Leica RTC360) and, by the end of the survey, you have several hundred million points that draw the building as it really is: walls out of square, slabs that slope, exposed ducts and all.
Each point carries at least its three coordinates. In most cases it also carries an intensity value (the strength of the laser return, useful for telling materials apart) and an RGB colour taken from the panoramic photographs shot at each station. That is what makes a coloured point cloud as readable as a site visit.
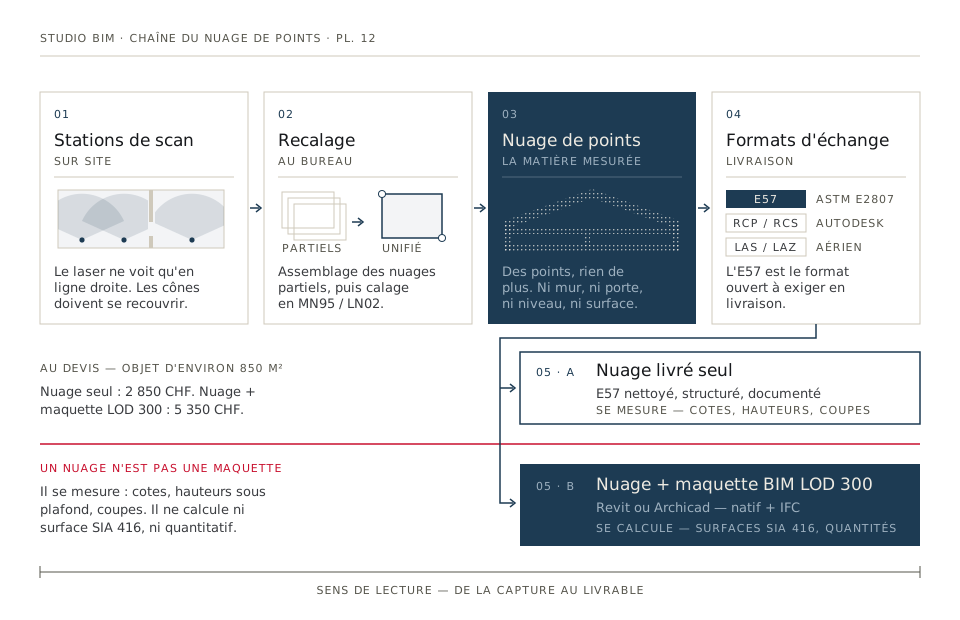
What the point cloud is not: a model. There is no “wall”, no “door”, no “level” in a point cloud, only points. You can take any dimension from it, cut plans through it, check a ceiling height; you cannot ask it for an SIA 416 area or a quantity take-off. This distinction shapes the rest of the article, and the choice between point cloud alone and BIM model follows directly from it.
How is a point cloud produced?
Two families of instruments dominate building surveys, and they are often combined on the same project. Our guide to 3D building scanning covers them technology by technology; here is the essential from the point of view of the cloud they produce.
The static scanner: station by station
Mounted on a tripod, the scanner sweeps its surroundings through 360° from a fixed point, then is moved: each position is a station, which produces its own partial cloud. A partitioned interior needs a lot of them. Every room, every corridor, every flight of stairs adds stations, because the scanner only measures what it can “see” in a straight line. In return, accuracy is the best of the two families: in the region of 2 to 5 mm on a building survey.
Mobile SLAM scanning: on foot
The mobile scanner (NavVis VLX type) is worn and captures continuously while the operator walks through the building. SLAM technology (simultaneous localisation and mapping) computes the instrument’s trajectory in real time and positions the points along the route. Productivity indoors is in a different league (a whole floor takes minutes), at the cost of lower accuracy, in the region of 5 to 15 mm, and of sensitivity to drift on long routes, corrected with control points.
Assembly: registering the stations
The final cloud does not exist when you leave the site: it is born in the office, when dozens or hundreds of partial clouds are registered into a single set. The software aligns the stations against each other through the overlap zones and the targets or reference spheres placed during capture; the operator checks the registration residuals station by station. This is the invisible step that makes or breaks quality: careful registration keeps the assembly error at millimetre level across the whole building; sloppy registration produces doubled walls that no amount of modelling can fix.
Where the project requires it, georeferencing is added: tying the cloud to the Swiss reference frame (MN95 coordinates, LN02 heights) through points measured by a land surveyor. This is indispensable as soon as the cloud has to talk to the cadastre or to a building permit application.
What density and accuracy should you really expect?
Two notions not to confuse. Density is the spacing between points: on surfaces close to the scanner, a point every few millimetres; density decreases with distance and angle of incidence. Accuracy is the positional error of each point, to which the registration error between stations is added.
In practice, on a well-run building survey:
| Method | Point accuracy | Typical density | Use |
|---|---|---|---|
| Static scanner | 2–5 mm | Very high, uneven (depends on distance) | Structures, heritage, demanding geometry |
| Mobile SLAM scanning | 5–15 mm | High, uniform along the route | Interiors, circulation, long linear runs |
A point of method: extreme density is of no use in itself. To model a wall or a slab, a sampling of 5–10 mm is more than enough; what counts is coverage (no blind spots on the elements to be modelled) and registration consistency. A cloud that is twice as dense but badly registered is a worse cloud.
E57, RCP, LAS: what do the point cloud formats mean?
This is the question that holds up more file exchanges than any other. Three families cover most building cases:
| Format | Nature | Strengths | Worth knowing |
|---|---|---|---|
| E57 | Open exchange format (ASTM E2807 standard) | Read by almost every professional package; carries points, colours, panoramic images and the station structure | The format to demand in every delivery |
| RCP / RCS | Autodesk ReCap format (RCP = project, RCS = individual scan) | Direct bridge to Revit, AutoCAD, Navisworks; handles regions and display | Proprietary format: useful alongside E57, not instead of it |
| LAS / LAZ | Airborne lidar format (ASPRS standard; LAZ = compressed version) | The standard for aerial data, including Switzerland’s public LiDAR | Designed for territory, not for the inside of a building |
| XYZ / PTS | Plain text (one line per point) | Universal, simple | Enormous files, no structure; a fallback format |
Two comments. First, E57 is the only one on the list that is open, structured and universally read at the same time: it is, for the point cloud, what IFC is to the BIM model, the format that guarantees your data will still be usable in ten years, whatever your software. Second, the LAS/LAZ you will meet most often is that of swisstopo’s aerial data; its decimetre-level accuracy and aerial viewpoint are no substitute for a dedicated scan, as our comparison Swiss public LiDAR vs dedicated scan explains.
How do you use a point cloud in Revit or ArchiCAD?
In Revit: the compulsory detour through ReCap
Revit does not read E57 directly. The standard route: convert the E57 to RCP/RCS in Autodesk ReCap, then link the cloud in Revit via “Insert > Point Cloud”. Two settings condition all the work that follows:
- Positioning. Link the cloud by shared coordinates (or “origin to origin” if the cloud was prepared for it), never “centre to centre”: a cloud georeferenced in MN95 and dropped in by eye loses all its value.
- Regions. ReCap lets you split the cloud into regions (by level, by zone) and Revit lets you control their display. Never work with the whole cloud permanently displayed: switch on the slice you need, hide the rest.
The linked cloud then serves as the modelling backdrop: walls, slabs and roofs are set on the points, with deviations resolved according to the agreed tolerances.
In ArchiCAD: native E57 import
ArchiCAD imports E57 (and XYZ) natively and converts it into a point cloud object placed in the model. Same reflexes as on the Revit side: check the coordinate system on import, split the cloud into subsets by level rather than loading the whole building, and purge the point cloud objects from the delivered file once modelling is complete.
File size, and how to keep it under control
A building point cloud is heavy: a few gigabytes for a detached house, several dozen for an apartment block. Three practices stop that weight from paralysing the project:
- Link, don’t import. In Revit as in ArchiCAD, the cloud remains an external referenced file; the working model stays light.
- Split by level or by zone. One file per floor loads, displays and shares painlessly; a monolithic 40 GB file does not.
- Match density to use. For modelling, a cloud resampled at 5–10 mm is enough; keep the full-density cloud in the archive and work on the lighter version.
A well-delivered cloud arrives already structured that way: cleaned (passers-by and measurement noise removed), split and documented (coordinate system, date, density). That is what we deliver as a 3D scan only service.
Point cloud alone or BIM model: what should you order?
The question comes up in almost every quote discussion, and the answer rests on the distinction made at the start of this article: a point cloud is measured, a BIM model is calculated.
Order the point cloud alone if your team does its own modelling (draughtspeople comfortable with scan-to-BIM), if you need a dated reference record before works, or if the project only calls for spot checks on dimensions. On budget, scan only starts at CHF 610; for a building of around 850 m², expect around CHF 2’850, cleaned and structured E57 cloud delivered in 4 to 5 working days.
Order the point cloud plus BIM model if the project lives in Revit or ArchiCAD: preliminary design within the existing building, construction drawings, SIA 416 areas, quantity take-offs, building permit application. On the same 850 m² building, the full survey with LOD 300 model comes to around CHF 5’350, and if you already have a usable point cloud, modelling alone is priced at around CHF 2’725. In every case, the delivered model must meet precise criteria for structure and tolerances: our checklist for a usable scan-to-BIM model lists what to demand.
The false economy is the point cloud ordered alone “to save money” when the model will be needed three months later: the hours your team spends modelling, or having it modelled, come on top of the scan price, with no guarantee that the cloud was captured at the density and coverage that modelling requires.
Common pitfalls (and how to avoid them)
The incomplete cloud. A scanner only measures what it sees: a cupboard against a wall, an attic nobody visited, a locked room, so many holes in the cloud, discovered when modelling starts. The remedy is upstream: a precise written scope (which rooms, which levels, exteriors or not) and access organised for the day of the survey.
Hidden zones treated as measured. A coloured cloud is so readable that people forget there is not a single point behind the lining, the duct or the suspended ceiling. What is hidden is interpreted or completed by opening up, never “measured by the scan”. A serious delivery documents these zones.
The unusable third-party file. A real case: for a barn in the canton of Vaud, a client sent us the E57 of a survey carried out by a third party, so that we could produce an ArchiCAD model from it. On audit, the cloud turned out to be unusable (patchy overlap between stations, entire zones missing) and the building had to be scanned again. The lesson applies to any cloud you did not commission yourself: have the file audited before ordering any modelling on it. The audit takes little time and avoids paying for a model built on false data.
The “viewing only” deliverable. Some offers deliver the cloud in an online viewer, with no usable E57 file. You can look, but you cannot work. Make the E57, with its documented coordinate system, a contractual requirement.
Frequently asked questions
What is a 3D point cloud?
It is the set of millions of points measured with a laser scanner on the surfaces of a building or site, each point defined by its X, Y, Z coordinates, often completed with an intensity and a colour. It forms a measurable digital copy of the existing building, from which 2D drawings or a BIM model are extracted. The term also refers to a type of chart in statistics, which is entirely unrelated.
How do you open an E57 file in Revit?
Revit does not read E57 directly: first convert it to RCP/RCS with Autodesk ReCap, then link the result in Revit via “Insert > Point Cloud”. Choose positioning by shared coordinates or origin to origin, never “centre to centre”, to preserve the cloud’s georeferencing.
What is the difference between a point cloud and a BIM model?
The point cloud is a raw measurement: points, with no objects and no intelligence. The BIM model is a modelled interpretation of those points: walls, slabs and rooms carrying information, from which SIA 416 areas, quantities and drawings are extracted. You can take a dimension from a point cloud; you cannot calculate a standardised area or a quantity take-off from it.
How big is a point cloud file?
From a few gigabytes for a detached house to several dozen for an apartment block, depending on density and colourisation. A well-delivered cloud is split by level or by zone and offered in a resampled version for modelling, with the full density kept in the archive. The LAZ format compresses heavily but remains marginal in building work.
How much does a 3D scan without modelling cost?
At Studio BIM, scan only, meaning delivery of the cleaned, structured and documented E57 cloud, starts at CHF 610; for around 850 m², expect around CHF 2’850, delivered in 4 to 5 working days. BIM modelling can be ordered later on that cloud. The quote configurator prices your case in 2 minutes.
The point cloud is the raw material; it still has to be the right one. Price your scan, point cloud alone or with a BIM model, in 2 minutes: studiobim.ch/devis.